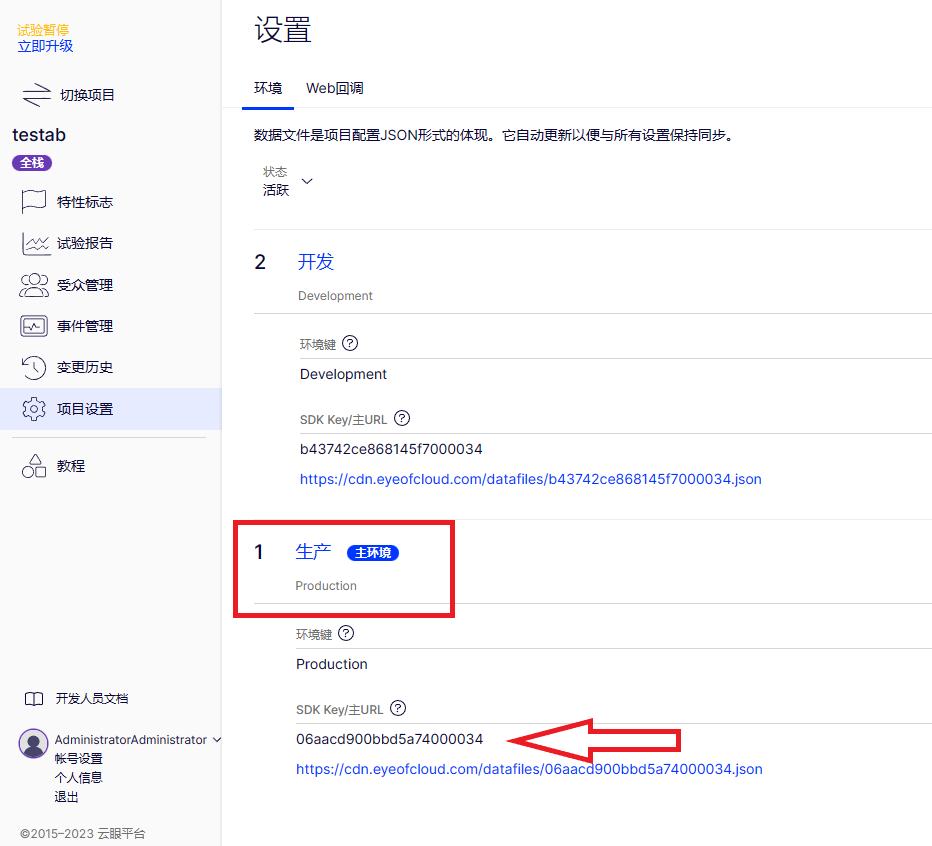
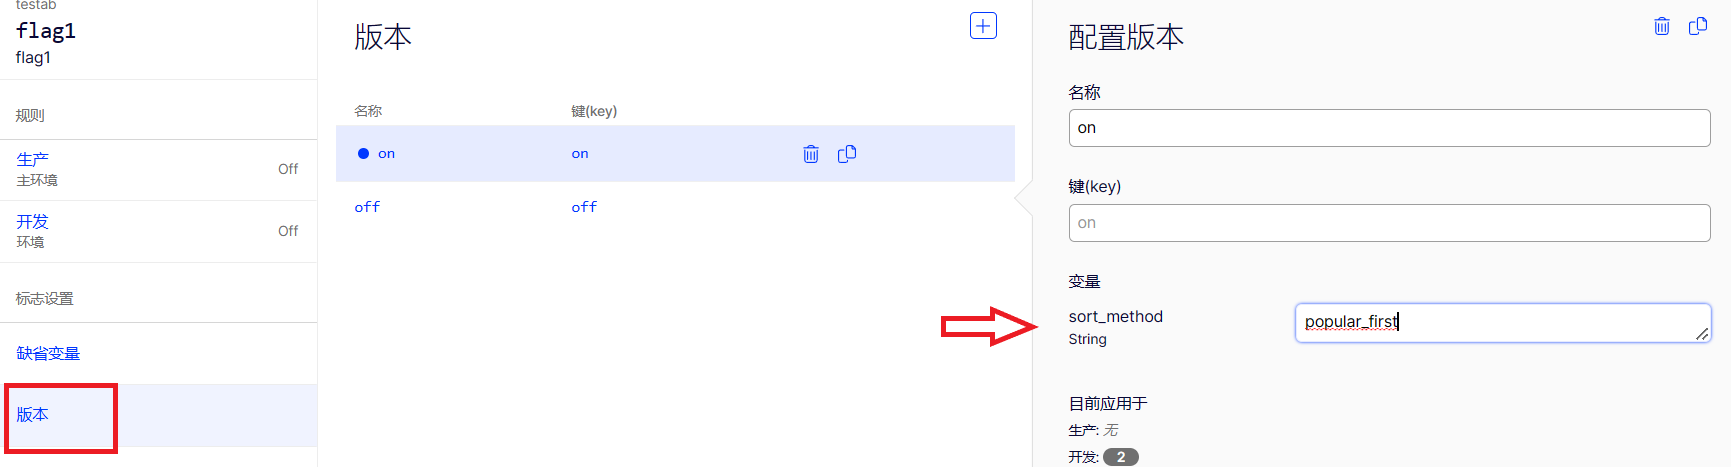
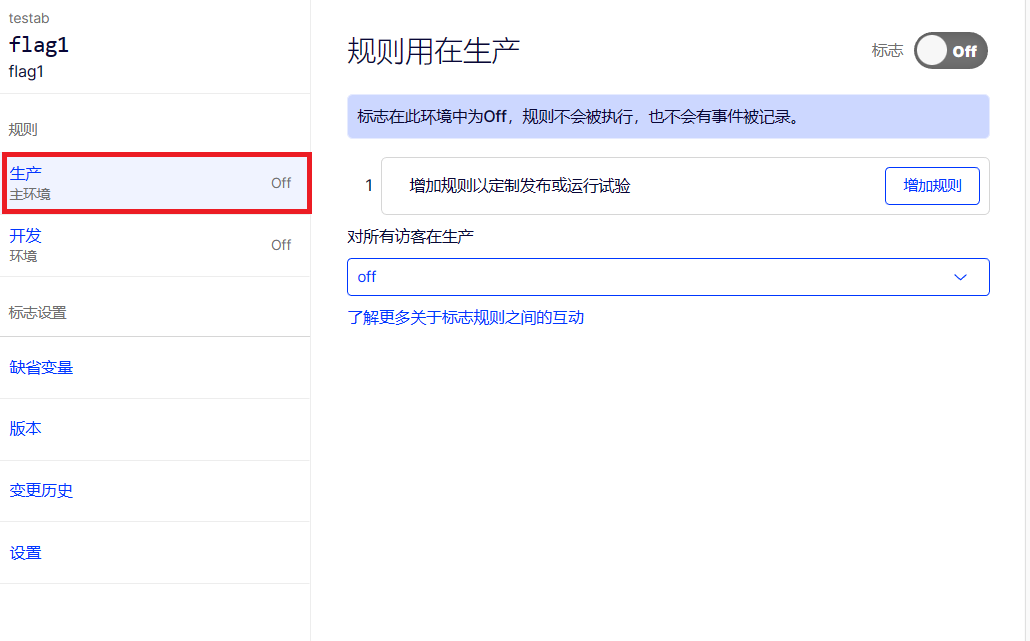
require "eyeofcloud/eyeofcloud_factory"
# this 云眼 initialization is synchronous. for other methods see the Ruby SDK reference
eyeofcloud_client = 云眼::云眼Factory.default_instance('<YOUR_SDK_KEY>')
if (eyeofcloud_client.is_valid)

    # --------------------------------
    # to get rapid demo results, generate random users. Each user always sees the same variation unless you reconfigure the flag rule.     # --------------------------------

    on_flags = false

    for i in 1..10
        user_id = (rand 1000..9999).to_s
        # --------------------------------
        # Create hardcoded user & bucket user into a flag variation
        # --------------------------------

        user = eyeofcloud_client.create_user_context(user_id);
        # "product_sort" corresponds to a flag key in your 云眼 project
        decision = user.decide("product_sort")

        # did decision fail with a critical error?
        if !decision.variation_key
            puts "decision error: #{decision.reasons.join("' '")}"
        end

        # get a dynamic configuration variable
        # "sort_method" corresponds to a variable key in your 云眼 project
        sort_method = decision.variables["sort_method"];

        # --------------------------------
        # Mock what the users sees with print statements (in production, use flag variables to implement feature configuration)
        # --------------------------------

        # always returns false until you enable a flag rule in your 云眼 project
        if decision.enabled
            on_flags = true
        end

        puts "\n\nFlag " + (decision.enabled ? "on" : "off")  + ". User number  #{user.user_id} saw flag variation: #{decision.variation_key} and got products sorted by: #{sort_method} config variable as part of flag rule: #{decision.rule_key}"
    end
    if !on_flags
        puts "\n\nFlag was off for everyone. Some reasons could include:" +
             "\n1. Your sample size of visitors was too small. Rerun, or increase the iterations in the FOR loop" +
             "\n2. Check your SDK key. Verify in Settings>Environments that you used the right key for the environment where your flag is toggled to ON." +
             "\ncheck your key at  https://app.eyeofcloud.com/v2/projects/#{eyeofcloud_client.config_manager.config.project_id}settings/implementation"
    end
else
    puts "云眼 client invalid. Verify in Settings>Environments that you used the primary environment's SDK key"
end
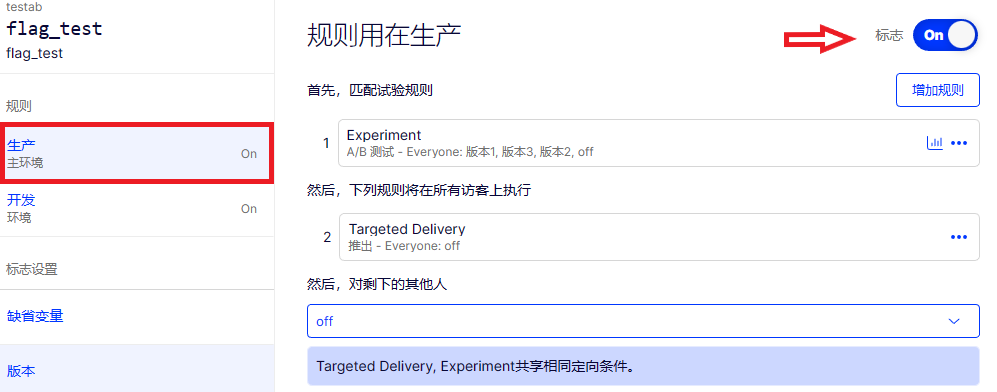
Flag on. User number 6998 saw flag variation: on and got products sorted by: popular_first config variable as part of flag rule: targeted_delivery

Flag on. User number 1177 saw flag variation: on and got products sorted by: popular_first config variable as part of flag rule: targeted_delivery

Flag on. User number 9714 saw flag variation: on and got products sorted by: popular_first config variable as part of flag rule: targeted_delivery

Flag on. User number 4140 saw flag variation: on and got products sorted by: popular_first config variable as part of flag rule: targeted_delivery

Flag on. User number 4994 saw flag variation: on and got products sorted by: popular_first config variable as part of flag rule: targeted_delivery

Flag off. User number 8700 saw flag variation: off and got products sorted by: alphabetical config variable as part of flag rule: default-rollout-208-19963693913

Flag off. User number 9912 saw flag variation: off and got products sorted by: alphabetical config variable as part of flag rule: default-rollout-208-19963693913

Flag on. User number 6560 saw flag variation: on and got products sorted by: popular_first config variable as part of flag rule: targeted_delivery

Flag on. User number 9252 saw flag variation: on and got products sorted by: popular_first config variable as part of flag rule: targeted_delivery

Flag on. User number 6582 saw flag variation: on and got products sorted by: popular_first config variable as part of flag rule: targeted_delivery
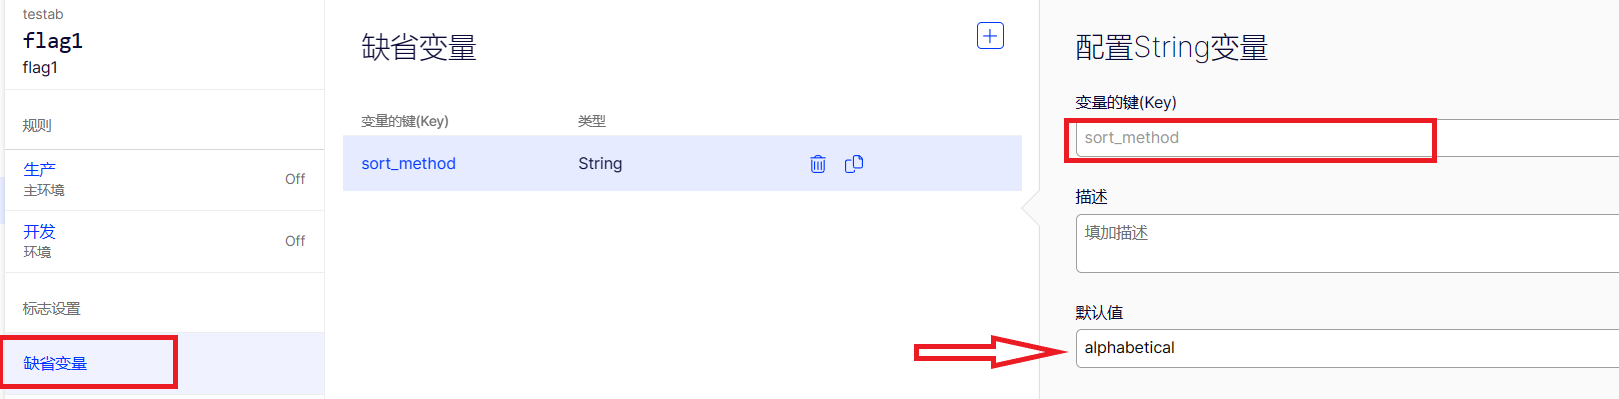
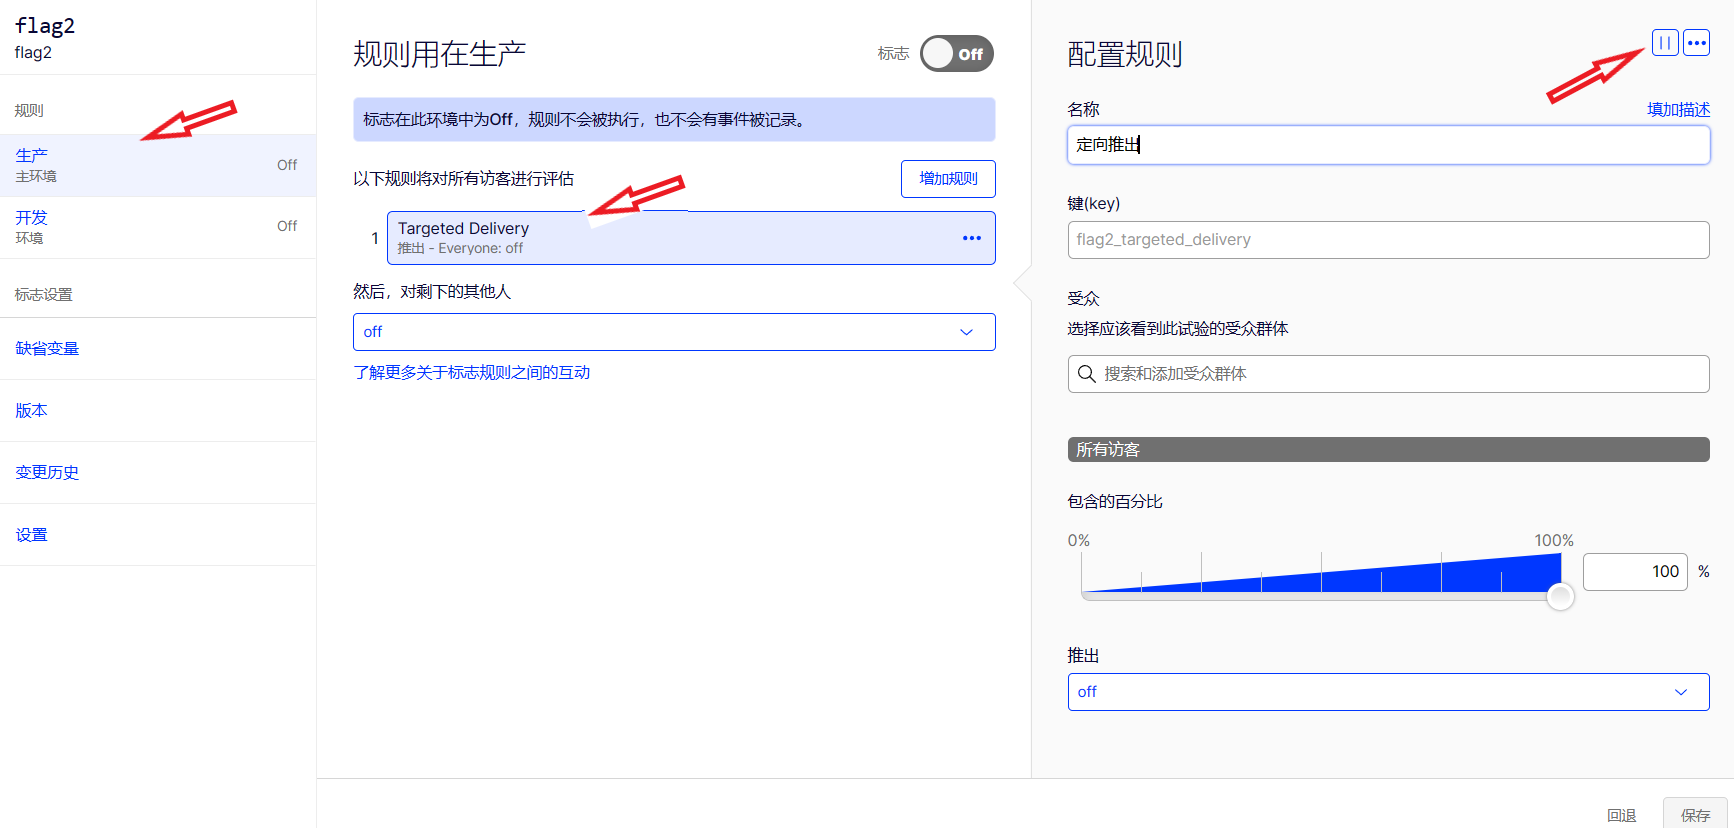
user = eyeofcloud_client.create_user_context(user_id)
# "product_sort" corresponds to the flag key you create in the 云眼 app
decision = user.decide("product_sort")
# always returns false until you enable a flag rule in the 云眼 app
if decision.enabled
    # "sort_method" corresponds to variable key you define in 云眼 app
    sort_method = decision.variables["sort_method"]
    puts "sort_method: #{sort_method}"
end
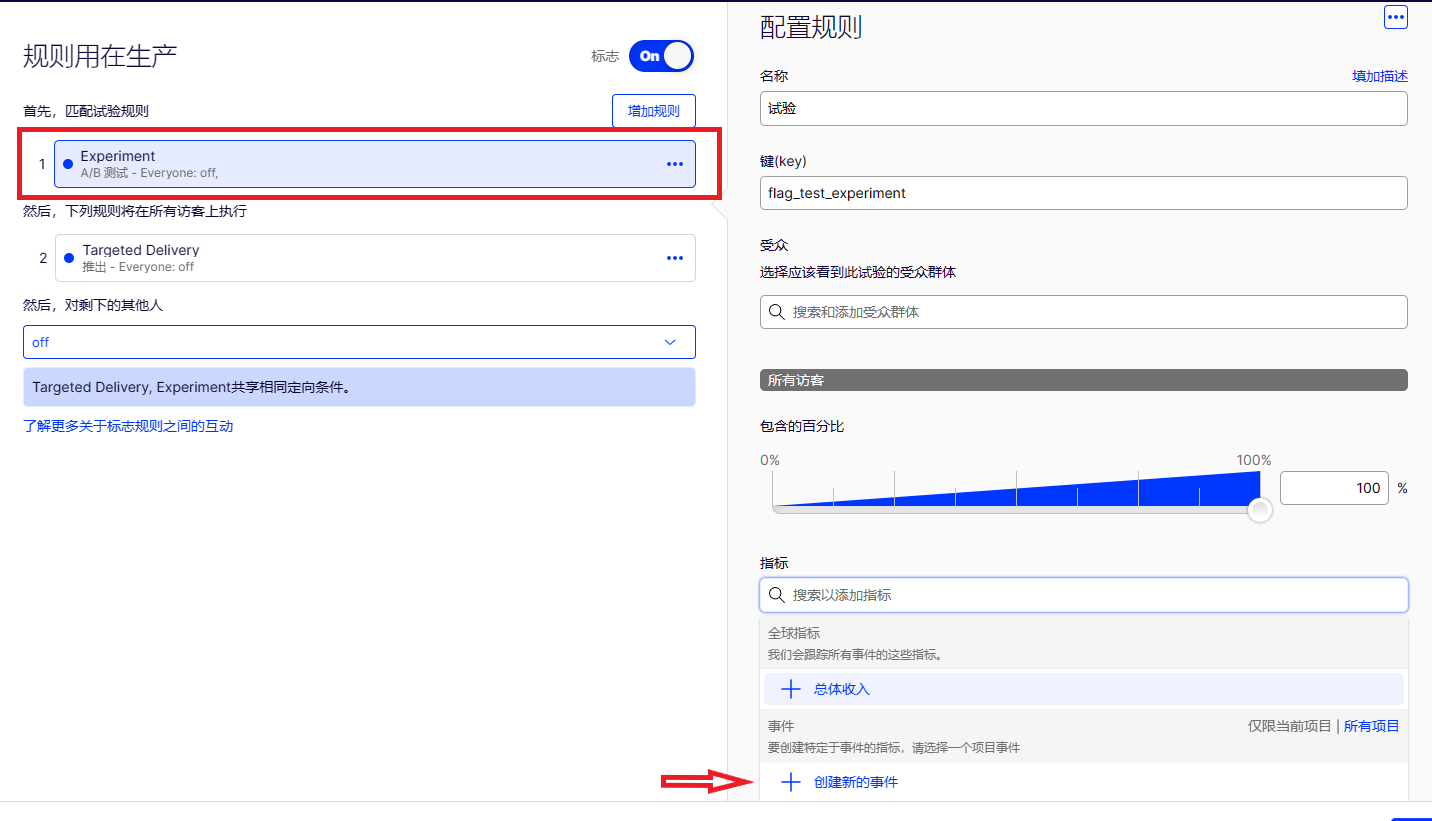
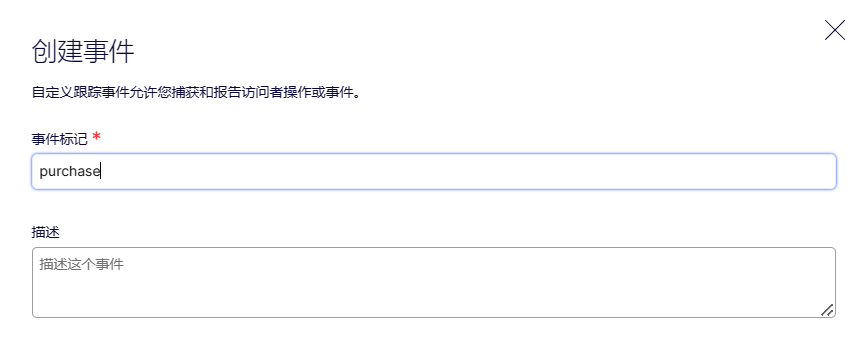
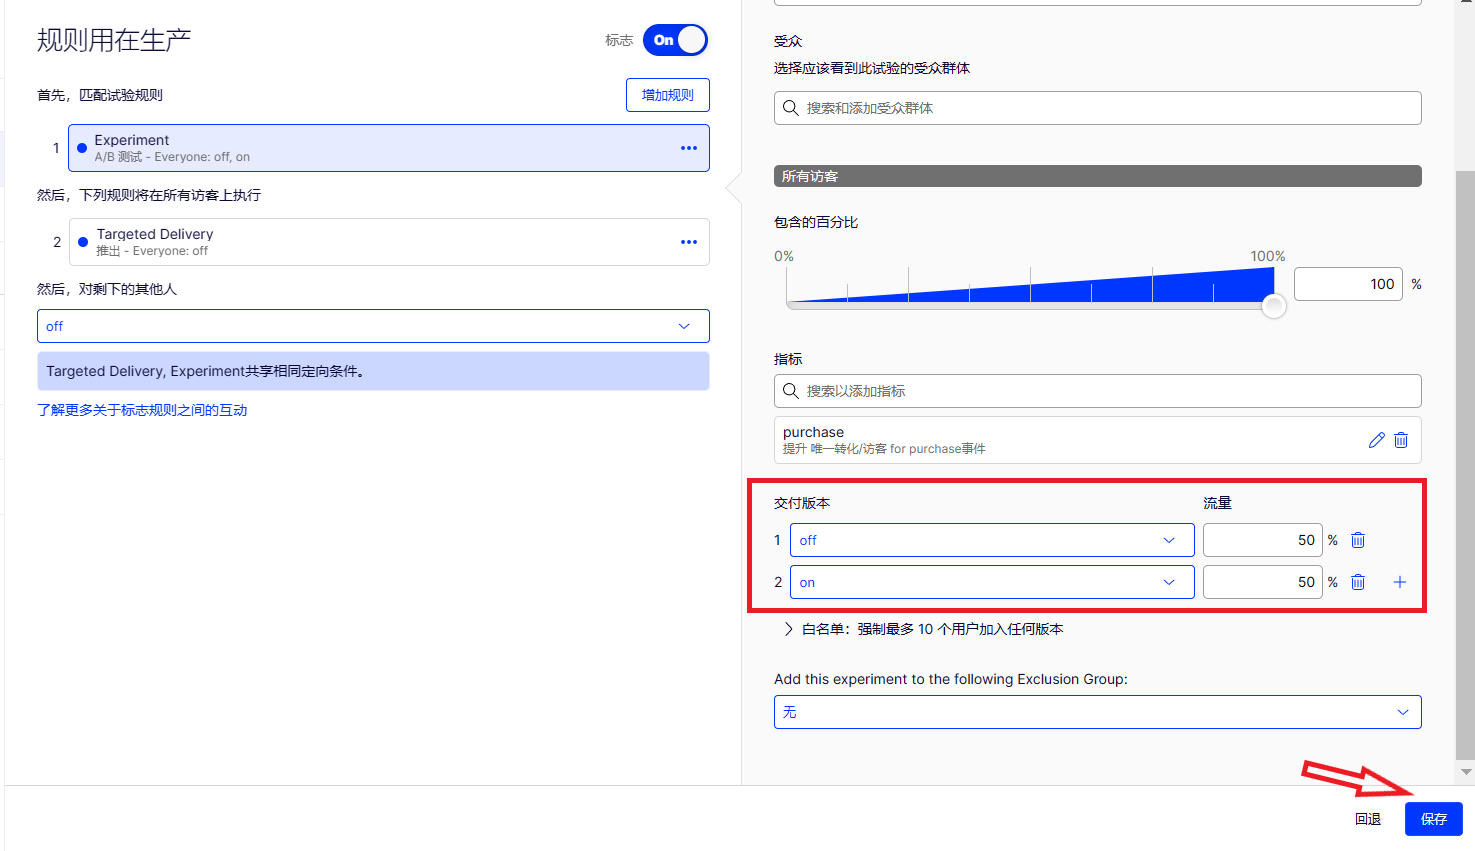
require "eyeofcloud/eyeofcloud_factory"
require 'json'

# mock tracking a user event so you can see some experiment reports
def mock_purchase(user)
    puts "Pretend that user #{user.user_id} made a purchase? y/n "
    answer = gets.chomp.strip
    if answer.downcase == "y"
        # track a user event you defined in the 云眼 app
        user.track_event("purchase")
        puts "云眼 recorded a purchase in experiment results for user #{user.user_id}"
    else
        puts "云眼 didn't record a purchase in experiment results  for user #{user.user_id}"
    end
end

# this 云眼 initialization is synchronous. for other methods see the Ruby SDK reference
eyeofcloud_client = 云眼::云眼Factory.default_instance('YOUR_SDK_KEY')
# --------------------------------
# OPTIONAL: Add a notification listener so you can integrate with third-party analytics platforms
# --------------------------------

# def on_decision(type, user_id, attributes, decision_info)
#     # Access type on decisionObject to get type of decision
#     if (type == "flag")
#         serialized_json_info = decision_info.to_json
#         puts "Feature flag access related information: #{serialized_json_info}"
#         # Send data to analytics provider here
#     end
# end

# callback_reference = lambda do |*args|
#     on_decision(*args)
# end

# eyeofcloud_client.notification_center.add_notification_listener(云眼::NotificationCenter::NOTIFICATION_TYPES[:DECISION], callback_reference)

# --------------------------------
# to get rapid demo experiment results, generate random users. Each user is deterministically hashed into a variation.
# --------------------------------
on_flags = false

for i in 1..5
    user_id = (rand 1000..9999).to_s
    # --------------------------------
    # Create hardcoded user & bucket user into a flag variation
    # --------------------------------

    user = eyeofcloud_client.create_user_context(user_id)
    # "product_sort" corresponds to a flag key in your 云眼 project
    decision = user.decide("product_sort")
    # did decision fail with a critical error?
    if !decision.variation_key
        puts "decision error: #{decision.reasons.join("' '")}"
    end

    # get a dynamic configuration variable
    # "sort_method" corresponds to a variable key in your 云眼 project
    sort_method = decision.variables["sort_method"]
    decision_msg = decision.enabled ? "on" : "off"

    if decision.enabled
        on_flags = true
    end
    # Mock what the users sees with print statements (in production, use flag variables to implement feature configuration)
    # always returns false until you enable a flag rule in your 云眼 project

    puts "\nFlag #{decision_msg}. User number #{user.user_id} saw flag variation: #{decision.variation_key} and got products sorted by #{sort_method} config variable as part of flag rule: #{decision.rule_key}"
    mock_purchase(user)
end

if !on_flags
    puts "Flag was off for everyone. Some reasons could include:"
    puts "1. 1. Your sample size of visitors was too small. Rerun, or increase the iterations in the FOR loop"
    puts "2. By default you have 2 keys for 2 project environments (dev/prod). Verify in Settings>Environments "   "that you used the right key for the environment where your flag is toggled to ON."
    "\nCheck your key at https://app.eyeofcloud.com/v2/projects/#{eyeofcloud_client.config_manager.config.project_id}/settings/implementation"
else
    puts "\n\nDone with your mocked A/B test."
    puts "Check out your report at  https://app.eyeofcloud.com/v2/projects/#{eyeofcloud_client.config_manager.config.project_id}/reports"
    puts "Be sure to select the environment that corresponds to your SDK key"
end
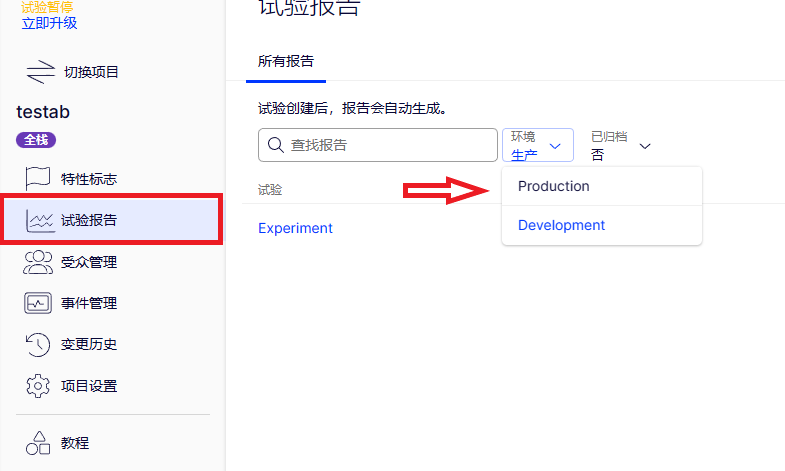
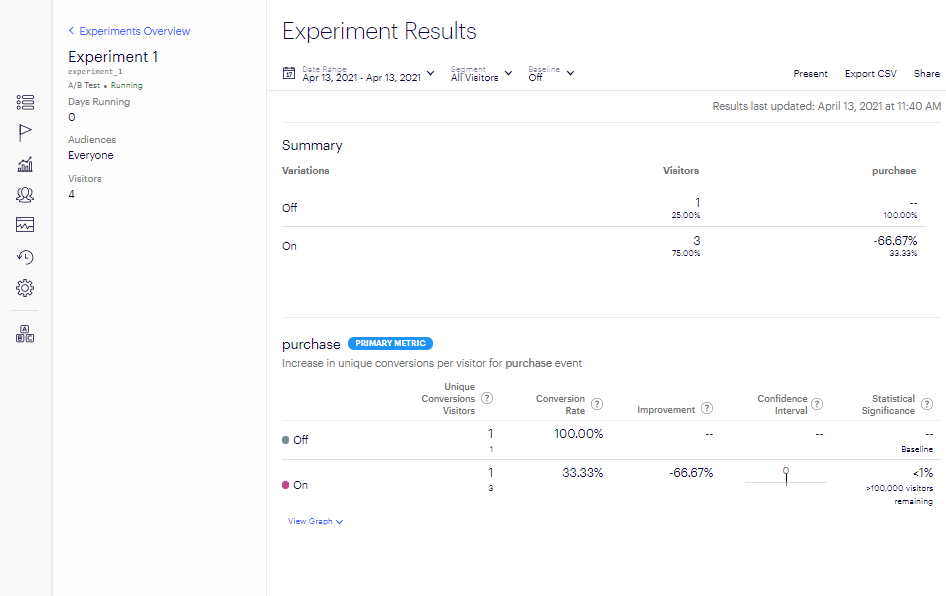
Flag on. User number 1496 saw flag variation: on and got products sorted by: popular_first config variable as part of flag rule: experiment_1 Pretend that user 1496 made a purchase? y/n
n
云眼 didn't record a purchase in experiment results for user 1496

Flag off. User number 1194 saw flag variation: off and got products sorted by: alphabetical config variable as part of flag rule: experiment_1 Pretend that user 1194 made a purchase? y/n
y
云眼 recorded a purchase in experiment results for user 1194

Flag off. User number 5815 saw flag variation: off and got products sorted by: alphabetical config variable as part of flag rule: experiment_1 Pretend that user 5815 made a purchase? y/n
y
云眼 recorded a purchase in experiment results for user 5815

Flag on. User number 1248 saw flag variation: on and got products sorted by: popular_first config variable as part of flag rule: experiment_1 Pretend that user 1248 made a purchase? y/n
y
云眼 recorded a purchase in experiment results for user 1248

Flag off. User number 9580 saw flag variation: off and got products sorted by: alphabetical config variable as part of flag rule: experiment_1 Pretend that user 9580 made a purchase? y/n
n
云眼 didn't record a purchase in experiment results for user 9580

Done with your mocked A/B test.
Check out your report at  https://app.eyeofcloud.com/v2/projects/19957465438/reports
Be sure to select the environment that corresponds to your SDK key
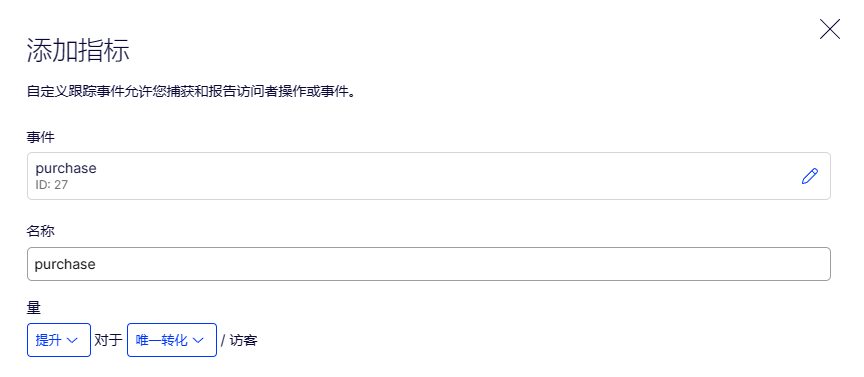
# Track how users behave when they see a flag variation
# e.g., after your app processed a purchase, let 云眼 know what happened: user.track_event("purchased");