import React, { useState } from 'react';import { createInstance, EyeofcloudProvider, useDecision,} from '@eyeofcloud/react-sdk';const eyeofcloudClient = createInstance({ sdkKey:'<YOUR_SDK_KEY>' });function Pre(props) { return <pre style={{ margin: 0 }}>{props.children}</pre>}function isClientValid() { return eyeofcloudClient.getEyeofcloudConfig() !== null;}const userIds = [];while (userIds.length < 10) { // to get rapid demo results, generate an array of random users. Each user always sees the same variation unless you reconfigure the flag rule. userIds.push((Math.floor(Math.random() * 999999) + 100000).toString())}function App() { const [hasOnFlag, setHasOnFlag] = useState(false); const [isDone, setIsDone] = useState(false); const [isClientReady, setIsClientReady] = useState(null); eyeofcloudClient.onReady().then(() => { setIsDone(true); isClientValid() && setIsClientReady(true); }); let projectId = '{project_id}'; if (isClientValid()) { const datafile = JSON.parse(eyeofcloudClient.getEyeofcloudConfig().getDatafile()); projectId = datafile.projectId; } return ( <EyeofcloudProvider eyeofcloud={eyeofcloudClient} // Generally React SDK runs for one client at a time i.e for one user throughout the lifecycle. // You can provide the user Id here once and the SDK will memoize and reuse it throughout the application lifecycle. // For this example, we are simulating 10 different users so we will ignore this and pass override User IDs to the useDecision hook for demonstration purpose. user={{ id: 'default_user' }} > <pre>Welcome to our Quickstart Guide!</pre> {isClientReady && <> {userIds.map((userId) => <Decision key={userId} userId={userId} setHasOnFlag={setHasOnFlag} />)} <br /> {!hasOnFlag && <FlagsOffMessage projectId={projectId} />} </> } {isDone && !isClientReady && <Pre>Eyeofcloud client invalid. Verify in Settings -> Environments that you used the primary environment's SDK key</Pre>} </EyeofcloudProvider> )}function FlagsOffMessage({ projectId }) { const navLink = `https://app.eyeofcloud.com/v2/projects/${projectId}/settings/implementation`; return ( <div> <Pre>Flag was off for everyone. Some reasons could include:</Pre> <Pre>1. Your sample size of visitors was too small. Rerun, or increase the iterations in the FOR loop</Pre> <Pre>2. By default you have 2 keys for 2 project environments (dev/prod). Verify in Settings>Environments that you used the right key for the environment where your flag is toggled to ON.</Pre> <Pre>Check your key at <a href={navLink}>{navLink}</a></Pre> <br /> </div> );}function Decision({ userId, setHasOnFlag }) { // Generally React SDK runs for one client at a time i.e for one user throughout the lifecycle. // You can provide the user Id once while wrapping the app in the Provider component and the SDK will memoize and reuse it throughout the application lifecycle. // For this example, we are simulating 10 different users so we will ignore this and pass override User IDs to the useDecision hook for demonstration purpose. // This override will not be needed for normal react sdk use cases. const [decision, clientReady] = useDecision('product_sort', {}, {overrideUserId: userId}); // Don't render the component if SDK client is not ready yet. if (!clientReady) { return '' } const variationKey = decision.variationKey; // did decision fail with a critical error? if (variationKey === null) { console.log(' decision error: ', decision['reasons']); } if (decision.enabled) { setTimeout(() => setHasOnFlag(true)); } // get a dynamic configuration variable // "sort_method" corresponds to a variable key in your Eyeofcloud project const sortMethod = decision.variables['sort_method']; return ( <Pre> {`\nFlag ${decision.enabled ? 'on' : 'off'}. User number ${userId} saw flag variation: ${variationKey} and got products sorted by: ${sortMethod} config variable as part of flag rule: ${decision.ruleKey}`} </Pre> );}export default App;
使用 HTML 脚本标记
<!DOCTYPE html><html><head> <title>Quickstart Guide</title> <script src="https://unpkg.com/@eyeofcloud/eyeofcloud-sdk/dist/eyeofcloud.browser.umd.min.js"></script></head><body> <pre>Welcome to our Quickstart Guide!</pre> <pre id="errors"></pre> <pre id="experiences"></pre> <pre id="result"></pre> <script> var eyeofcloudClient = window.eyeofcloudSdk.createInstance({ sdkKey: '<YOUR_SDK_KEY>' }); eyeofcloudClient.onReady().then(() => { var errors = document.getElementById('errors'); if (!eyeofcloudClient.isValidInstance()) { errors.innerText = 'Eyeofcloud client invalid. Verify in Settings>Environments that you used the primary environment\'s SDK key'; return; } var experiences = document.getElementById('experiences'); let hasOnFlags = false; for (let i = 0; i < 10; i++) { // to get rapid demo results, generate random users. Each user always sees the same variation unless you reconfigure the flag rule. let userId = (Math.floor(Math.random() * (10000 - 1000) + 1000)).toString(); // Create hardcoded user & bucket user into a flag variation let user = eyeofcloudClient.createUserContext(userId); // "product_sort" corresponds to a flag key in your Eyeofcloud project let decision = user.decide('product_sort'); let variationKey = decision.variationKey; // did decision fail with a critical error? if (variationKey === null) { errors.innerText += `\n\ndecision error: ${decision['reasons']}`; } // get a dynamic configuration variable // "sort_method" corresponds to a variable key in your Eyeofcloud project let sortMethod = decision.variables['sort_method']; if (decision.enabled) { hasOnFlags = true; } // Mock what the users sees with print statements (in production, use flag variables to implement feature configuration) // always returns false until you enable a flag rule in your Eyeofcloud project experiences.innerText += `\n\nFlag ${decision.enabled ? 'on' : 'off'}. User number ${user.getUserId()} saw flag variation: ${variationKey} and got products sorted by: ${sortMethod} config variable as part of flag rule: ${decision.ruleKey}`; } var result = document.getElementById('result'); if (!hasOnFlags) { result.innerText = "\n\nFlag was off for everyone. Some reasons could include:" + "\n1. Your sample size of visitors was too small. Rerun, or increase the iterations in the FOR loop" + "\n2. By default you have 2 keys for 2 project environments (dev/prod). Verify in Settings>Environments that you used the right key for the environment where your flag is toggled to ON." + "\n\nCheck your key at https://app.eyeofcloud.com/v2/projects/" + eyeofcloudClient.projectConfigManager.getConfig().projectId + "/settings/implementation"; }; }); </script></body></html>
Flag on. User number 6998 saw flag variation: on and got products sorted by: popular_first config variable as part of flag rule: targeted_deliveryFlag on. User number 1177 saw flag variation: on and got products sorted by: popular_first config variable as part of flag rule: targeted_deliveryFlag on. User number 9714 saw flag variation: on and got products sorted by: popular_first config variable as part of flag rule: targeted_deliveryFlag on. User number 4140 saw flag variation: on and got products sorted by: popular_first config variable as part of flag rule: targeted_deliveryFlag on. User number 4994 saw flag variation: on and got products sorted by: popular_first config variable as part of flag rule: targeted_deliveryFlag off. User number 8700 saw flag variation: off and got products sorted by: alphabetical config variable as part of flag rule: default-rollout-208-19963693913Flag off. User number 9912 saw flag variation: off and got products sorted by: alphabetical config variable as part of flag rule: default-rollout-208-19963693913Flag on. User number 6560 saw flag variation: on and got products sorted by: popular_first config variable as part of flag rule: targeted_deliveryFlag on. User number 9252 saw flag variation: on and got products sorted by: popular_first config variable as part of flag rule: targeted_deliveryFlag on. User number 6582 saw flag variation: on and got products sorted by: popular_first config variable as part of flag rule: targeted_delivery
// always returns false until you enable a flag rule in the Eyeofcloud appif (decision.enabled) { // "sort_method" corresponds to variable key you define in Eyeofcloud app var sortMethod = decision.variables['sort_method']; console.log('sort_method: ', sortMethod);}
import React, { useState } from 'react';import { createInstance, EyeofcloudProvider, useDecision,} from '@eyeofcloud/react-sdk';const eyeofcloudClient = createInstance({ sdkKey: '<YOUR_SDK_KEY>'});function Pre(props) { return <pre style={{ margin: 0 }}>{props.children}</pre>}function isClientValid() { return eyeofcloudClient.getEyeofcloudConfig() !== null;}const userIds = [];while (userIds.length < 4) { // to get rapid demo results, generate an array of random users. Each user always sees the same variation unless you reconfigure the flag rule. userIds.push((Math.floor(Math.random() * 999999) + 100000).toString())}let userMessages = userIds.reduce((result, userId) => ({ ... result, [userId]: []}), {});const donePromise = new Promise((resolve) => { setTimeout(() => { eyeofcloudClient.onReady().then(() => { if (isClientValid()) { userIds.forEach((userId) => { const question = `Pretend that user ${userId} made a purchase?`; const trackEvent = window.confirm(question); eyeofcloudClient.track('purchase', userId); const message = trackEvent ? "Eyeofcloud recorded a purchase in experiment results for user " + userId : "Eyeofcloud didn't record a purchase in experiment results for user " + userId; userMessages[userId].push(`${question} ${trackEvent ? 'Y' : 'N'}`, message); }); } resolve(); }); }, 500); });function App() { const [hasOnFlag, setHasOnFlag] = useState(false); const [isDone, setIsDone] = useState(false); const [isClientReady, setIsClientReady] = useState(null); donePromise.then(() => setIsDone(true)); eyeofcloudClient.onReady().then(() => { isClientValid() && setIsClientReady(true) }); let projectId = '{project_id}'; if (isClientValid()) { const datafile = JSON.parse(eyeofcloudClient.getEyeofcloudConfig().getDatafile()); projectId = datafile.projectId; } const reportsNavLink = `https://app.eyeofcloud.com/v2/projects/${projectId}/reports`; return ( <EyeofcloudProvider eyeofcloud={eyeofcloudClient} // Generally React SDK runs for one client at a time i.e for one user throughout the lifecycle. // You can provide the user Id here once and the SDK will memoize and reuse it throughout the application lifecycle. // For this example, we are simulating 10 different users so we will ignore this and pass override User IDs to the useDecision hook for demonstration purpose. user={{ id: 'default_user' }} > <pre>Welcome to our Quickstart Guide!</pre> {isClientReady && <> { userIds.map((userId) => ( <> <Decision key={userId} userId={userId} setHasOnFlag={setHasOnFlag} /> { userMessages[userId].map((message) => <Pre>{message}</Pre>)} <br /> </> )) } {!hasOnFlag && <FlagsOffMessage projectId={projectId} />} {isDone && ( <> <Pre>Done with your mocked A/B test.</Pre> <Pre>Check out your report at <a href={reportsNavLink}>{reportsNavLink}</a></Pre> <Pre>Be sure to select the environment that corresponds to your SDK key</Pre> </> )} </> } {isDone && !isClientReady && <Pre>Eyeofcloud client invalid. Verify in Settings -> Environments that you used the primary environment's SDK key</Pre>} </EyeofcloudProvider> )}function FlagsOffMessage({ projectId }) { const navLink = `https://app.eyeofcloud.com/v2/projects/${projectId}/settings/implementation`; return ( <div> <Pre>Flag was off for everyone. Some reasons could include:</Pre> <Pre>1. Your sample size of visitors was too small. Rerun, or increase the iterations in the FOR loop</Pre> <Pre>2. By default you have 2 keys for 2 project environments (dev/prod). Verify in Settings>Environments that you used the right key for the environment where your flag is toggled to ON.</Pre> <Pre>Check your key at <a href={navLink}>{navLink}</a></Pre> <br /> </div> );}function Decision({ userId, setHasOnFlag }) { // Generally React SDK runs for one client at a time i.e for one user throughout the lifecycle. // You can provide the user Id once while wrapping the app in the Provider component and the SDK will memoize and reuse it throughout the application lifecycle. // For this example, we are simulating 10 different users so we will ignore this and pass override User IDs to the useDecision hook for demonstration purpose. // This override will not be needed for normal react sdk use cases. const [decision, clientReady] = useDecision('product_sort', {}, {overrideUserId: userId}); // Don't render the component if SDK client is not ready yet. if (!clientReady) { return '' } const variationKey = decision.variationKey; // did decision fail with a critical error? if (variationKey === null) { console.log(' decision error: ', decision['reasons']); } if (decision.enabled) { setTimeout(() => setHasOnFlag(true)); } // get a dynamic configuration variable // "sort_method" corresponds to a variable key in your Eyeofcloud project const sortMethod = decision.variables['sort_method']; return ( <Pre> {`Flag ${decision.enabled ? 'on' : 'off'}. User number ${userId} saw flag variation: ${variationKey} and got products sorted by: ${sortMethod} config variable as part of flag rule: ${decision.ruleKey}`} </Pre> );}export default App;
Flag on. User number 103512 saw flag variation: on and got products sorted by: popular_first config variable as part of flag rule: experimentFlag off. User number 134981 saw flag variation: off and got products sorted by: alphabetical config variable as part of flag rule: experimentFlag on. User number 254103 saw flag variation: on and got products sorted by: popular_first config variable as part of flag rule: experimentFlag on. User number 736927 saw flag variation: on and got products sorted by: popular_first config variable as part of flag rule: experiment
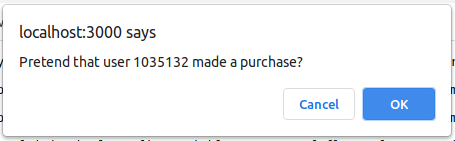
要求假装购买的确认框类似于以下内容:
Confirmation.png
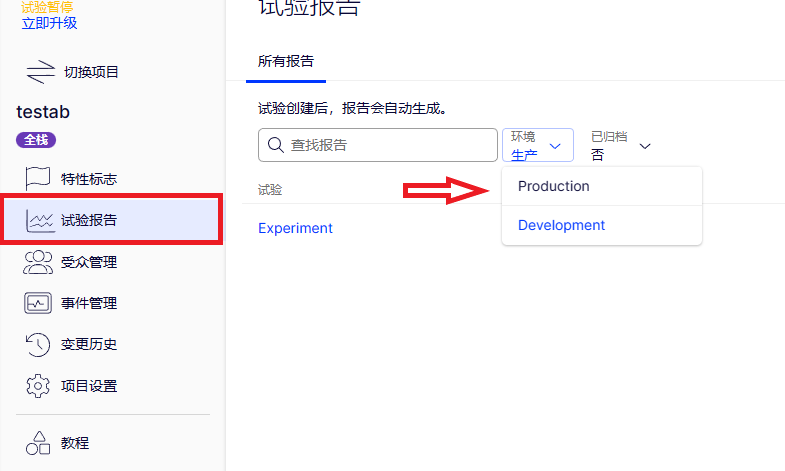
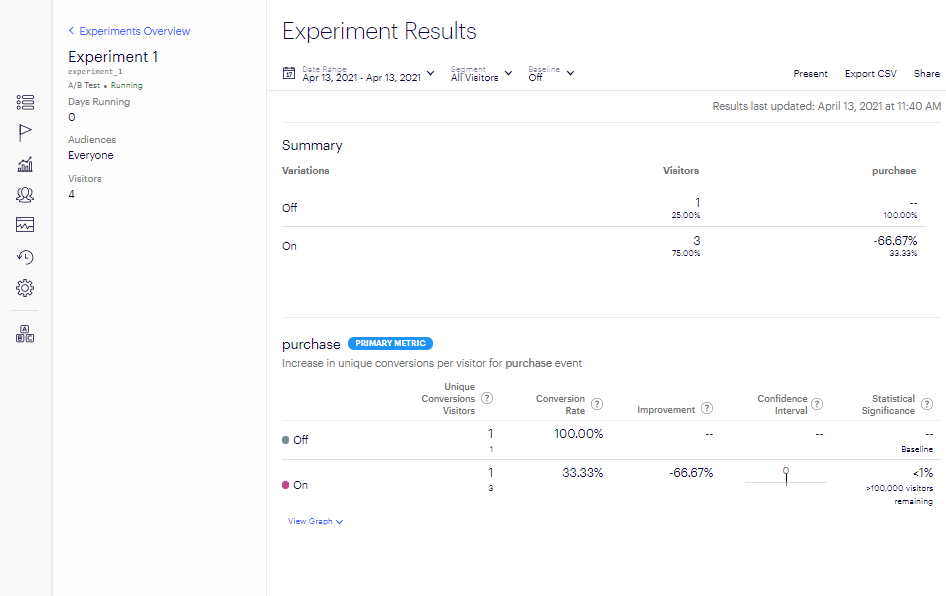
为每个用户做出选择后,最终输出将类似于以下内容:
.HTML
Welcome to our Quickstart Guide!Flag on. User number 103512 saw flag variation: on and got products sorted by: popular_first config variable as part of flag rule: experimentPretend that user 103512 made a purchase? NEyeofcloud didn't record a purchase in experiment results for user 103512Flag off. User number 134981 saw flag variation: off and got products sorted by: alphabetical config variable as part of flag rule: experimentPretend that user 134981 made a purchase? NEyeofcloud didn't record a purchase in experiment results for user 134981Flag on. User number 254103 saw flag variation: on and got products sorted by: popular_first config variable as part of flag rule: experimentPretend that user 254103 made a purchase? NEyeofcloud didn't record a purchase in experiment results for user 254103Flag on. User number 736927 saw flag variation: on and got products sorted by: popular_first config variable as part of flag rule: experimentPretend that user 736927 made a purchase? NEyeofcloud didn't record a purchase in experiment results for user 736927Done with your mocked A/B test.Check out your report at https://app.eyeofcloud.com/v2/projects/20130771383/reportsBe sure to select the environment that corresponds to your SDK key
// Track how users behave when they see a flag variation// e.g., after your app processed a purchase, let Eyeofcloud know what happened:eyeofcloudClient.track('purchased');